7DRL - Beginnings
The time is upon us once again: 2018's 7DRL. This year I've come prepared with a pretty solid idea of what I'm going to do and a good suite of tools to back it up. For this devlog I thought I'd share where I'm starting from, the tooling I am using, and a bit about why.
What I've been doing
My coding efforts have been quiet recently, I haven't been chatting on Discord or posting much to /r/roguelikedev as my time was stretched thing and I've been bouncing around different projects with nothing really sticking, but I'm hoping to change that with this year's 7DRL.
I thought to kick things off I'd share a bit about my most recent efforts, a lot of the code used here will make it into my 7DRL. My most recent prototype involved using a more abstract graph based map representation, something that handled very well as a webapp. This prototype taught me a lot of lessons and produced a lot of useful coding that I'll be carrying into my 7DRL.

Map Generation and Exploring Nodes (scaled down for GIF)
Tools of the Trade
My 7DRL for this year will be an HTML/JS (Typescript actually) app. It's a dev environment I'm intimately familiar with and the modern web has brought about a lot of great options for how to build a roguelike in HTML. I'm going to quickly run through my build environment and talk a bit about getting the bare bones configuration up and running.
I'm making my starting environment available here for those interested. See the attached file for my empty starter environment. I don't know that anyone will want to adopt new technologies right at the start of the 7DRL, but maybe keep this in mind for afterwards.
Installation
Grab
To use this sandbox you'll first need to install node and yarn (see the documentation links below). Then do the following:
To install dependencies:
> yarn install
To launch the dev server (connect to localhost:8080 after running):
> yarn run start
To build a distribution in the dist/ folder
> yarn run build
To run unit tests (if you write any):
> yarn run test
Once you verify the app is working you're ready to go and start coding your files in the /src/ directory.
If you have questions about the starting point, feel free to reach out to me on Twitter (@IAmSlogo) or Discord (@Slogo in the roguelikes discord). I can't promise detailed technical support as I'll be busy, but I can probably answer easy questions and help out. Bear in mind I'm not great at helping out with build issues, so if you're stuck trying to get yarn or node installed I may not have the best advice for you.
Node/NPM:
If you're doing anything with webdev in the modern era you're probably going to want a copy of node ready to go. Not only will it provide you access to a massive selection of libraries and dev tools, it will also simplify and streamline your dev pipeline compared to just opening up your index.html file in the browser.
Node is available from https://nodejs.org/en/, or better yet use NVM to manage your node version: https://github.com/creationix/nvm & https://github.com/coreybutler/nvm-windows depending on your environment of choice.
For this project I also adopted a first, using the package manager yarn over node's built in npm. They're effectively very similar for a project of this scope, so all that matters is having one or the other.
Webpack & Webpack-dev-server
https://github.com/webpack/webpack & https://github.com/webpack/webpack-dev-server
Webpack has taken over the Javascript ecosystem as one of the de-facto build tools, and for good reason, it's powerful, relatively easy to use, and has a strong set of plugins available. Just before the 7DRL Webpack 4.0 released which includes a 0-configuration support so you can get up and running right away. With webpack-dev-server things get even better as a way to watch your files and provide live reloading on file changes. With webpack installed you can add plugins to cover all sorts of other build tools as well.
Babel & Typescript
Two other powerhouses in the javascript world right now, both unlock a wealth of opportunities for roguelike development and can be used separately or together.
Babel is vital for writing clean and concise Javascript. It provides the capability to transpile javascript written using modern features into something that all browsers will run properly. This opens up the possibility of using modern features like Spread Syntax and Async & Await. I highly recommend it for any project.
Typescript is a more optional, and perhaps controversial, choice. Typescript extends Javascript by adding typing syntax to the language. It's something that will slow you down if you aren't used to using it, but it can enable some powerful stuff with the proper IDE as well as prevent a whole host of errors. Since it works based on object shapes rather than explicit classes and types (think Java) it still has more flexibility than a strongly typed language.
Typescript also enabled some more interesting and advanced typing applications. One problem I commonly have with event based systems is the arguments sent through an event are hard to remember and are prone to errors. Typescript comes to the rescue here:
//In my global typings.d.ts
type UIEventTypes = { DEBUG_UI_EVENT: { message: string }; OTHER_UI_EVENT: {};
};

//In my event system code
export function triggerUIEvent<T extends keyof UIEventTypes>( event: T, args: UIEventTypes[T]
) {...}
With that setup I can now autocomplete my event args based on the event I am triggering. Even though my event name is a simple string, my Typescript & IDE (VSCode) can leverage typescript to suggest & enforce the correct object shape for that event.
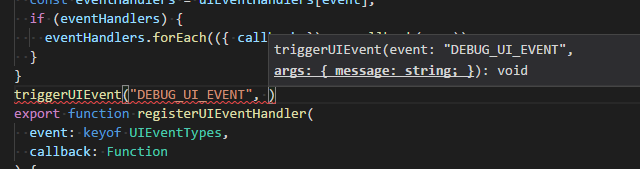
It's like magic!
PostCSS & CSS-Modules
https://github.com/css-modules/css-modules
On the styling side of things I opted for PostCSS and css-modules. PostCSS is a css transpiler that has a whole suite of useful plugins. For this project I am only interested in two: autoprefixer which will add browser prefixes to rules you define when needed for cross browser functionality, and postcss-icss-values which exposes a simple variable functionality so I can define colors and other attributes as constants and share them across css modules.
CSS-Modules on the other hand exposes the ability to import CSS into your javascript files and apply locally named & scoped styles. It's a great tool to prevent name collision in your css and helps organize your css with your components. It's ok if you don't quite follow along, the code below serves as a good example of what you can do with CSS-Modules.
//In playfield.ts
const s = require("./playfield.styles.pcss");
myElement.classList.add(s.playfield);
//In playfield.styles.pcss
@values columns: 7;
@values rows: 7;
.playfield {
  display: grid;
  grid-template-columns: repeat(columns, 1.75em);
  grid-template-rows: repeat(rows, 1.75em);
  grid-gap: 1em;
  user-select: none;
}
Prettier
https://github.com/prettier/prettier
Prettier is my code formatting of choice. Typescript already covers a lot of what I'd otherwise need ESLint for and prettier mops up the rest. It's highly opinionated which most people probably have strong opinions about, but I enjoy the ability to code without worrying about my code format.
Jest
https://github.com/facebook/jest
Jest is my unit testing tool of choice. It's not something I'm expecting to use all that much during the 7DRL, but it's nice to have the ability to write a test when it will shortcut development time. I also had some existing tests from my ported over code so it was worth adding.
And that's it! Thanks for reading this far and good luck to you in the 7DRL.
Leave a comment
Log in with itch.io to leave a comment.